Download TZX-713B V2.1 firmware image (514.6 MB)
Showing posts with label how. Show all posts
Showing posts with label how. Show all posts
Friday, July 15, 2016
How to fix itechie A88 7 inch tablet stuck in boot logo
How to Fix iTechie A88 Android Tablet Computer unable to boot up and is stuck in boot logo.
 |
| iTechie A88 tablet stuck on boot logo - image by MZtech |
“I couldn’t determine exactly what caused my Android Tablet to stuck in boot logo every time I turn it on. I haven’t installed any update or flashed its firmware.”
 |
| iTechie A88 Tablet (Black) - image by MZtech |
Specifications:
- Model Name: iTechie A88
- Product Type: Wi-Fi Tablet Computer
- Screen Size: 7.0” ; 800 x 480 resolution ; 5-point capacitive touch screen
- Operating System: Android 4.2 Jelly Bean (upgradeable)
- Processor: AllWinner A13 1.0Ghz ARMv7
- RAM: 512MB
- Device Memory: 4.0 GB NAND Fast Flash
- Connectivity: Wi-Fi 802.11 b/g/n
- Camera: 0.3 MP front ; 2.0 MP back with flash
- Battery: 2000 mAh (milliampere-hour)
Hard Reset:
iTechie A88 recovery mode can be accessed by pressing altogether the power button, volume up (+) button and volume down (-) button. If you can access recovery options, all you have to do is select the reset to factory settings. It could fix “stuck in boot logo” issue.
Flashing Firmware:“I tried accessing recovery mode but it boots directly and stops at logo again. If you are unable to access the recovery mode like me, you need to flash the stock firmware image to the device in order to fix it.”
Things you’ll need:
- Firmware image file
- LiveSuit v1.11 application for your flashing tool.
To make sure you download the correct firmware version for your Android tablet, check on the motherboard number /build number. Unlock download link below.
 |
| iTechie A88 motherboard build number - image by MZtech |
How To Flash Firmware:
- Run LiveSuit application and click yes on whether or not to enter upgrade guide.
- Select General Upgrade Mode.
- Select Yes on Whether to select new image file.
- Browse and select the downloaded firmware image file.
- Make sure your tablet is off before connecting to PC.
- Connect tablet to Computer with USB (Universal Serial Bus) cord.
- Press and hold Power button and volume up (+) button.
- Release buttons once connection is detected by LiveSuit application.
- Flashing will start right away.
- Flashing will take a couple of minutes. Secure your USB connection to make sure your tablet doesn’t disconnect while flashing to avoid error.
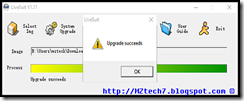
- You will see a prompt if the flashing process finished successfully.
- You can now boot your tablet by turning it on. (Note: first boot after flashing may take a little longer than usual.)
- The default language is in Hindu. To change it to back to English, go to settings –> select Language & input (letter A icon) –> select the very first option in the selection on the right side –> scroll down to find English and select it. ( change also the input language of your keyboard).
 |
| LiveSuit application flashing firmware - image by MZtech |
 |
| LiveSuit application flashing successful - image by MZtech |
Did this solution helped you? Please let me know by providing your feedback below. If you find this post helpful, dont forget to hit like or share buttons.

How to Hard Reset Alcatel Pop D5 with Factory Reset
Alcatel Pop D5 is a good smartphone device. This cell phone’s all hardware and software is very latest. And Alcatel company’s all smartphone made by latest android OS. This company’s one of the best cell phone’s name Alcatel Pop D5. It is a very good smartphone. When you wish password reset on your best cell phone. You must have to know how to do hard reset/factory reset. For your kind information, when you do hard reset your smartphone, you must backup your all data because after hard reset you lost your all valuable data from internal memory. Here we provide you data backup service. Every new post we try to provide you best brand smartphones hard reset solution.
Here some Specifications of Alcatel Pop D5: Li-Ion 1800 mAh battery, 2G, 3G,GSM, HSPA network supported, Micro sim supported, Quad-core 1.3 GHz processor, TFT capacitive touchscreen, 16M colors, RAM 512 MB, internal memory 4 GB, Expandable memory up to 32 GB, 4.5? display, weight 150 g, Back camera 5 MP, Front camera VGA, camera pixels 2592 x 1944, autofocus, LED flash, Bluetooth v4.0, A2DP, Wi-Fi 802.11 a/b/g/n, Wi-Fi Direct, hotspot, Android OS, v4.4.2 (KitKat), Accelerometer sensors, FM radio, HTML Browser, USB supported, microUSB V2.0. If you forgotten your phone pattern lock, user code, google lock or phone code. Now I show you how to do Alcatel Pop D5 hard reset.
? Also Read: How to Hard Reset Lenovo A2010 Cell Phone
Hard Reset steps :-
Step 1 : First turn off your BlackBerry Smartphone.
Step 2 : Release any SIM card and SD card on your smartphone.
Step 3 : Press and Hold Vol+ key and Power key 10 seconds.

Step 4: After some time you got system recovery mode Use Vol – key select wipe data/factory reset and press Power key to confirm.
? Also Read: How to Easy Reset HTC One Remix Cell Phone
Step 5: Use Vol- key to select Yes — delete all user data and press Power key to Confirm. (Notice: when you select Yes — delete all user data and press POWER key you lost your phone all user data)
Step 6: Wait until complete reset your phone, select reboot system now and press Power key.
Step 7: Now your tablet device will reboot.
Step 8: Your Android tablet device is now OK!!
? Also Read: Top Cell Phone Micromax Canvas Silver 5 Reset Way
Factory resets steps:-
Step1: First Turn on your Lava Iris Fuel F1 Mini Device.
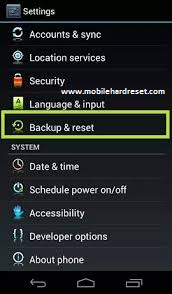
Step 2: Touch and Press Menu Button Go To Setting Menu >> Scroll and select Backup & reset >> Factory data reset >> Reset phone >> Erase everything. After factory reset, your tablet device will reboot.
? Also Read: How to Reset Samsung Galaxy Avant Cell Phone
How to Hard Reset Factory Reset Lava Iris Fuel F1 Mini
Lava Iris Fuel F1 Mini is the latest smartphone in their all smartphone. This is the best smartphone and this cell phone display is high quality with this battery performance is good. And this smartphone huge popularity in time. So most user search this phone in all search engine. This mobile’s use new and latest android OS version. This mobile Wi-Fi is very strong. When you to buy this smartphone. You must have to know how to do hard reset/factory reset. For your kind information, when you do hard reset your smartphone, you must backup your all data because after hard reset you lost you’re all valuable data from internal memory. Here we provide you data backup service. Every new post we try to provide you best brand smartphones hard reset solution.
Here some Specifications of Lava Iris Fuel F1 Mini: Non-removable Li-Ion 2000 mAh battery, 2G, 3G, GSM, HSPA network supported, Dual-sim supported, 1.0 GHz processor, TFT Capacitive touchscreen, 16M colors, RAM 2 GB, internal memory 32 GB, Expandable memory No, 4.5? display, weight 146 g, Back camera 5 MP, Front camera VGA, camera pixels 2592 x 1944, autofocus, LED flash, Bluetooth v4.0, A2DP, Wi-Fi 802.11 b/g/n, Android OS, v4.2.2 (KitKat), Accelerometer, gyro, proximity, compass sensors, FM Radio, HTML Browser, USB supported, microUSB V2.0. If you forgotten your phone pattern lock, user code, google lock or phone code. Now I show you how to do Lava Iris Fuel F1 Mini hard reset.
?Related article: How to Hard Reset / Factory Reset Oppo Neo 5S
Hard Reset steps :-
Step 1 : First turn off your Acer tablet device.
Step 2 : Release any SIM card and SD card on your smartphone.
Step 3 : Press and Hold Vol+ key and Power key 10 seconds.
 |
| Lava Iris Fuel F1 Mini Hard Reset |
Step 4: After some time you got system recovery mode Use Vol – key select wipe data/factory reset and press Power key to confirm.
?Related article: How to Hard Reset/ Factory Reset Acer Liquid Z330
Step 5: Use Vol- key to select Yes — delete all user data and press Power key to Confirm. (Notice: when you select Yes — delete all user data and press POWER key you lost your phone all user data)
Step 6: Wait until complete reset your phone, select reboot system now and press Power key.
Step 7: Now your tablet device will reboot.
Step 8: Your Android tablet device is now OK!!
?Related article: How to Hard Reset/ Factory Reset Yezz Andy 4.5EL LTE
Factory resets steps:-
Step1: First Turn on your Lava Iris Fuel F1 Mini Device.
Step 2: Touch and Press Menu Button Go To Setting Menu >> Scroll and select Backup & reset >> Factory data reset >> Reset phone >> Erase everything. After factory reset, your tablet device will reboot.
?Related article: How to Hard Reset Huawei Honor 7I with Factory Reset
How To Hard Reset Blackberry Porsche Design P9982
BlackBerry Porsche Design P9982 is top smartphone present world. This smartphone camera quality is excellent. This smartphone made by top quality android OS. This also use top quality RAM and Processor, that’s why user smoothly use this smartphone. Pattern lock, forgotten user code and gmail lock is a common problem for smartphone. So when you buy a BlackBerry Porsche Design P9982 smartphones you must have to know how to hard reset/factory reset. For your kind information, when you hard reset your smartphone, you must backup your all data, because after hard reset you lost your all valuable data from internal memory. Here we provide you data backup service. Every new post we try to provide top smartphones hard reset solution.
Here some Specifications of BlackBerry Porsche Design P9982: Li-Ion 1800 mAh battery, 2G, 3G, 4G, GSM, HSPA/HSDPA, LTE network supported, Micro-Sim supported, Dual-core 1.5 GHz Krait processor, Capacitive touch-screen, 16M colors, RAM 2 GB, internal memory 64 GB, Expandable memory 64 GB, 4.2? display, weight 140 g, Back camera 8 MP, Front camera 2 MP, camera pixels 3264 x 2448, autofocus, LED flash, Bluetooth v4.1, A2DP, LE, Wi-Fi 802.11 a/b/g/n, dual-band, DLNA, Hotspot, BlackBary OS v10.2, upgradeable to v10.2.1, Accelerometer, Gyro, proximity, Compass Sensors, FM Radio No, HTML5 Browser, USB supported, microUSB V2.0. If you forgotten your phone pattern lock, user code, google lock or phone code. Now I show you how to do BlackBerry Porsche Design P9982 hard reset.
Here some Specifications of BlackBerry Porsche Design P9982: Li-Ion 1800 mAh battery, 2G, 3G, 4G, GSM, HSPA/HSDPA, LTE network supported, Micro-Sim supported, Dual-core 1.5 GHz Krait processor, Capacitive touch-screen, 16M colors, RAM 2 GB, internal memory 64 GB, Expandable memory 64 GB, 4.2? display, weight 140 g, Back camera 8 MP, Front camera 2 MP, camera pixels 3264 x 2448, autofocus, LED flash, Bluetooth v4.1, A2DP, LE, Wi-Fi 802.11 a/b/g/n, dual-band, DLNA, Hotspot, BlackBary OS v10.2, upgradeable to v10.2.1, Accelerometer, Gyro, proximity, Compass Sensors, FM Radio No, HTML5 Browser, USB supported, microUSB V2.0. If you forgotten your phone pattern lock, user code, google lock or phone code. Now I show you how to do BlackBerry Porsche Design P9982 hard reset.
?Related article: How to Hard Reset / Factory Reset Oppo Neo 5S
Hard Reset steps :-
Step 1 : First turn off your BlackBerry Smartphone.
Step 2 : Release any SIM card and SD card on your smartphone.
Step 3 : Press and Hold Vol+ key and Power key 10 seconds.
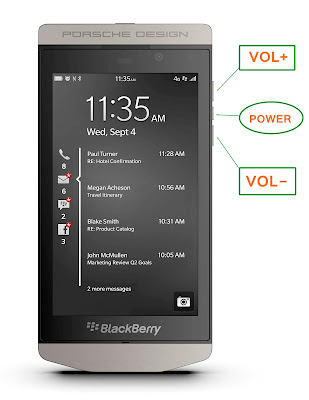
Step 4: After some time you got system recovery mode Use Vol – key select wipe data/factory reset and press Power key to confirm.
?Related article: How to Hard Reset/ Factory Reset Acer Liquid Z330
Step 5: Use Vol- key to select Yes — delete all user data and press Power key to Confirm. (Notice: when you select Yes — delete all user data and press POWER key you lost your phone all user data)
Step 6: Wait until complete reset your phone, select reboot system now and press Power key.
Step 7: Now your tablet device will reboot.
Step 8: Your Android tablet device is now OK!!
?Related article: How to Hard Reset/ Factory Reset Yezz Andy 4.5EL LTE
Factory resets steps:-
Step1: First Turn on your Lava Iris Fuel F1 Mini Device.
Step 2: Touch and Press Menu Button Go To Setting Menu >> Scroll and select Backup & reset >> Factory data reset >> Reset phone >> Erase everything. After factory reset, your tablet device will reboot.
?Related article: How to Hard Reset Huawei Honor 7I with Factory Reset
How to update multiple languages ROM for Xiaomi Mobile Phone

Method 1. The upgrade method
Flashing full MIUI ROM pack on the phone (This part applies to all the xiaomi phone models.). Download necessary files to prepare for flashing MIUI ROM
Note: Flashing a newer version of MIUI ROM doesn’t need to wipe data, but flashing an older one does.
STEP 1
Download the multilingual MIUIROM. If you have downloaded the latest installation pack, there is no need to download it again.
STEP 2
Connect your phone to the computer, and put the ROM file to the folder downloaded_rom in the SD card. Open Updater on the launcher, press the Menubutton – Select installation file. Choose the ROM pack you want to flash, and select Update now. How to update multiple languages ROM for Xiaomi Mobile Phone
STEP 3
After updating is completed, select Reboot now to enter the new system. How to update multiple languages ROM for Xiaomi Mobile Phone
Method 2. Updating zip file in Recovery
Please make sure that your phone has enough power.
STEP 1:
Download the multilingual MIUI ROM. Operate on the computer, rename the zip file as update.zip, and copy it to the root directory of the SD card. The update.zip copied from SD card to internal storage
STEP 2:
Enter Updater, press the Menu button, and select Reboot to recovery mode. Another way to enter recovery mode: turn off the phone, press the Volume+ key and the Power button at the same time, wait until the screen wakes.
STEP 3:
Select yourlanguage. Select to install update.zip to system one (use the volume keys to select, and the Power button to confirm). After the updating is completed, reboot to system one. How to update multiple languages ROM for Xiaomi Mobile Phone.
Flashing full MIUI ROM pack on the phone (This part applies to all the xiaomi phone models.). Download necessary files to prepare for flashing MIUI ROM
Note: Flashing a newer version of MIUI ROM doesn’t need to wipe data, but flashing an older one does.
STEP 1
Download the multilingual MIUIROM. If you have downloaded the latest installation pack, there is no need to download it again.
STEP 2
Connect your phone to the computer, and put the ROM file to the folder downloaded_rom in the SD card. Open Updater on the launcher, press the Menubutton – Select installation file. Choose the ROM pack you want to flash, and select Update now. How to update multiple languages ROM for Xiaomi Mobile Phone
STEP 3
After updating is completed, select Reboot now to enter the new system. How to update multiple languages ROM for Xiaomi Mobile Phone
Method 2. Updating zip file in Recovery
Please make sure that your phone has enough power.
STEP 1:
Download the multilingual MIUI ROM. Operate on the computer, rename the zip file as update.zip, and copy it to the root directory of the SD card. The update.zip copied from SD card to internal storage
STEP 2:
Enter Updater, press the Menu button, and select Reboot to recovery mode. Another way to enter recovery mode: turn off the phone, press the Volume+ key and the Power button at the same time, wait until the screen wakes.
STEP 3:
Select yourlanguage. Select to install update.zip to system one (use the volume keys to select, and the Power button to confirm). After the updating is completed, reboot to system one. How to update multiple languages ROM for Xiaomi Mobile Phone.


Don’t miss any of our future video tutorials, follow us on Youtube. Like us on Facebook. Add us in your circles on Google+. Watch our photo albums on Flickr. Subscribe now to our newsletter.
How to Solve Insufficient Storage problem in Android
How to Get Rid of Insufficient storage Space Problem in android without root .
How to Fix Insufficient Storage Available error in Google playstore .
So in this guide to solve the insufficient storage available on this device we will use 5 simple methods .
Trick to buy xiaomi redmi note 3 from amazon flash sale .
So starting with the First Method .
Solve Insufficient storage available in this Device Problem By Clearing Cache :-
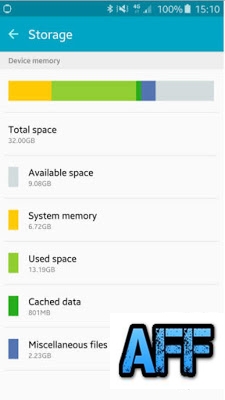 Now as in the above image you can see that there is a Cached data section of 801 mb which is basically useless . So here is How you can clear the cached Data and fix the no storage space available error .
Cached Data is temporary data stored by app developers . What the cached data do is whenever you open any website or app the cached files will be used instead of downloading again from servers .
Advantages :-
The cached data helps in loading the apps and some websites faster .
Disadvantages :-
As we mentioned earlier that the data is stored in your smartphone so it is obvious that it will take space on your smartphone . Sometimes the cached data size can reach upto 1.2gb in size .
It Freezes the smartphone while using some apps .
Makes down the smartphone slow .
So by clearing the cache you will be able to Solve the Insufficient storage available on this device problem .
Name and list of devices updating to android N 7.0 .
Fix insufficient storage available on this device Google playstore error .
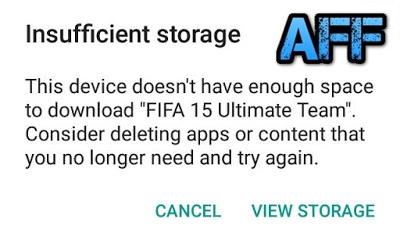 Method 2 to fix insufficient storage error :- Moving Apps to Sdcard .
By default android downloads the apps to Internal storage of smartphone and sometimes due to Many apps we get insufficient storage space error . There are many apps ( Not all ) you can move to Sd card and increase the Space in your internal storage .
Here is How yo can move apps to Sd card to Fix the insufficient storage available in this device error .
Do you get insufficient storage available error while downloading files from google playstore Or When you try to install a app or download a file you see the Less storage space available error on screen ? if yes then you are at right place . Today we are here with a guide on How to Fix Insufficient storage problem in android phone without root .
it happens many time when we want to download any app from Google Playstore and we get Less storage error . The problem of Insufficient storage mainly comes in smartphones like micromax,intex,Samsung,lava,karbonn,xolo and other old brands that doesnt come with features like space optimization . So today in this guide we will tell you How to Fix Insufficient storage problem in android smartphone without root .
How to Fix Insufficient Storage Available error in Google playstore .
So in this guide to solve the insufficient storage available on this device we will use 5 simple methods .
Trick to buy xiaomi redmi note 3 from amazon flash sale .
So starting with the First Method .
Solve Insufficient storage available in this Device Problem By Clearing Cache :-
- First of all Go to the Settings of your android smartphone .
- Now search for Storage settings .
- After going in the storage settings you will see a Option of Cached data , Simply press it . After pressing you will see that the Cached data is now reduced to 0 mb .
- So this was the first way to Solve the Insufficient storage problem in android .
Cached Data is temporary data stored by app developers . What the cached data do is whenever you open any website or app the cached files will be used instead of downloading again from servers .
Advantages :-
The cached data helps in loading the apps and some websites faster .
Disadvantages :-
As we mentioned earlier that the data is stored in your smartphone so it is obvious that it will take space on your smartphone . Sometimes the cached data size can reach upto 1.2gb in size .
It Freezes the smartphone while using some apps .
Makes down the smartphone slow .
So by clearing the cache you will be able to Solve the Insufficient storage available on this device problem .
Name and list of devices updating to android N 7.0 .
Fix insufficient storage available on this device Google playstore error .
By default android downloads the apps to Internal storage of smartphone and sometimes due to Many apps we get insufficient storage space error . There are many apps ( Not all ) you can move to Sd card and increase the Space in your internal storage .
Here is How yo can move apps to Sd card to Fix the insufficient storage available in this device error .
- Goto settings > applications > all .
- Now Open every app on by one .
- Whenever you will open a app you will see a Move To Sdcard option .
- However in some case you will see that the Move to Sdcard option is blurred which means the app cant be moved to sd card .
Method 3 to solve insufficient storage available error .
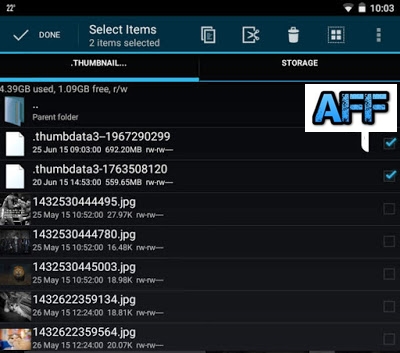
Sometimes the default apps in our android phone start making files itself and they are very big in size . The most common file which we find is the Thumbdata which is created by the gallery application of a android phone .
So here is How you can delete those unwanted apps and Fix Insufficient storage error in android .
- Go to your file explorer .
- Now search for .thumbnail file .
- After searching you will see many results .
- Now delete them one by one .
- After deleting you will see that you will bot receive Insufficient storage available error while downloading apps from google playstore .
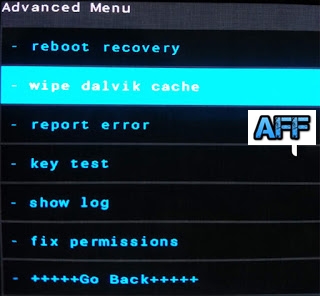
In the 1st method we told you to Clear cached data of apps and that is easy and can be done manually . But what about the System Cache ? So in this Method we will tell you to clear the system cache to solve the insufficient space error .
Here is How to clear dalvik cache to solve the Insufficient storage space error .
- First of all turn off your smartphone .
- After turning off boot the smartphone into cwm recovery .
- To boot into cwm recovery press Volume up + power button together .
- After booting into cwm recovery you will see many option .
- Choose Wipe Cache Partition .
- Then go to advanced settings and Choose wipe dalvik cache .
- After clearing cache go back to main screen and choose Reboot system now .
If still all of the above doesnt works the Try the Last and for Sure working method to Fix the Insufficient storage problem in android .
Method 5 .
In the 5th method we will tell you how to Reset your smartphone to get rid of the Insufficient storage available error .
Please remember that after resting your smartphone you will loose all your apps and files which includes the Images,contacts,songs and every file present on your android smartphone . So it is recommended to take a backup of your smartphone .
- First of all make a backup as mentioned earlier .
- Now go to settings of your smartphone .
- Now you will see a option of Backup/reset .
- Open it .
- And select the last option " Erase data on phone / Factory reset " .
- After selecting you will be asked to confirm resetting the phone .
- Choose Ok .
- The resetting process will be started .
- And after the Successfully Completion the smartphone will be rebooted .
So this was our guide on How to Fix insufficient storage available on this device error while downloading games from google playstore in android , i Hope this guide helped you in solving the Insufficient storage problem in android .
How to Fix Lenovo A536 by Flashing Firmware
Fix Or Factory Reset Your Lenovo A536 By Flashing Its Stock ROM / Firmware
 |
| Lenovo A536 Photo by MZtech |
Lenovo A536 Specification:
Year Released: 2014
SIM and Network: Dual MicroSim, GSM/HSPA
Size (Dimension): 5.50 x 2.83 x 0.39 in , weight - 148g
Screen: 5.0 in Multitouch Capacitive Touchscreen, 16M colors
Platform: Android O.S. 4.4.2 KitKat
Chipset: MediaTek MT6582M
CPU: Quad-Core 1.3Ghz Cortex A7
Memory: 8 GB Internal, 1 GB RAM, micro SD up to 32 GB
Camera: 5 MP (Megapixel) auto-focus with LED flash, 2 MP Secondary Camera, 1080p Video Resolution
Battery: Li-Po (Lithium Polymer) 2000 mAh (milliampere-hour), up to 300 hours standby time, up to 12 hours talk time
Why do you need to flash Lenovo a536 back to its stock ROM / firmware? There are various reasons but most of the time you need to flash it if:
- Wiping it back to factory settings doesnt work.
- Stuck at boot logo
- Phone wont start up / turn on.
- Forgotten pattern lock
How to flash Lenovo A536:
Things you need to download:
- Lenovo A536 Stock Rom / Firmware.
- SP Flash Tool.
DOWNLOAD TOOL
- Mediatek Drivers.
DOWNLOAD DRIVERS.
- Extract downloaded Stock ROM zip file.
- Extract SP Flash Tool.
- Run SP Flash Tool. Click on scatter file and load the scatter file found in extracted ROM file.
- Click on Download button.
- Turn off your phone and connect to PC using USB (Universal Serial Bus) cord.
- And wait for flashing to start by seeing the tab on SP Flash Tool loads with color red followed by color yellow. You will see a check mark pop up when its done successfully.
When you click Download Button in SP Flash Tool and you see an error message pop-up,
BROM Error
,format the device first before flashing.
If you have questions, need assistance, or feedback, feel free to post your comments below.
BROM Error
,format the device first before flashing.
If you have questions, need assistance, or feedback, feel free to post your comments below.
See Also:
Samsung Galaxy S4 (GT-i9505) Stuck At Boot Logo
OPlus O+ 8.31z Stock ROM / Firmware
Firefly Mobile S60 V4 Firmware
How to Hard Reset Factory Restore Acer Liquid Z530S
Anybody now can Smartphone’s reset solution. But In my view, just without you And I want you to learn this the hard reset system. And his job itself. One of the things covered and you can earn money. Mobile hard reset thing you can do at home. Our website only follows. So let’s go for showing how to hard reset and factory reset Acer Liquid Z530S smartphones. It is a good smartphone in the world. ?This mobile display is high quality with this battery performance is good. And this smartphone huge popularity in time. So most user search this phone in all search engine. This mobile’s use new and latest android OS version. This mobile Wi-Fi is very strong. When you to buy this smartphone. You must have to know how to do hard reset/factory reset. For your kind information, when you do hard reset your smartphone, you must backup your all data because after hard reset you lost you’re all valuable data from internal memory. Here we provide you data backup service. Every new post we try to provide you best brand smartphones hard reset solution.
Here some Specifications of Acer Liquid Z530S: Li-Ion 2420 mAh battery, 2G, 3G, 4G, GSM, HSPA, LTE network supported, Optional Dual-sim supported, Octa-core 1.3 GHz processor, IPS LCD Capacitive touchscreen, 16M colors, RAM 3 GB, internal memory 32 GB, Expandable memory 64 GB, 5.0? display, weight 144 g, Back camera 8 MP, Front camera 8 MP, camera pixels 3264 x 2448, autofocus, LED flash, Bluetooth v4.0, A2DP, Wi-Fi 802.11 b/g/n, Android OS, v5.1 (Lollipop), Accelerometer, proximity, sensors, FM Radio no, HTML5 Browser, USB supported, microUSB V2.0. If you forgotten your phone pattern lock, user code, google lock or phone code. Now I show you how to do Acer Liquid Z530S hard reset.
?Related article: How to Hard Reset / Factory Reset Oppo Joy 3
Hard Reset steps :-
Step 1 : First turn off your Acer smartphone.
Step 2 : Release any SIM card and SD card on your smartphone.
Step 3 : Press and Hold Vol+ key and Power key 10 seconds.
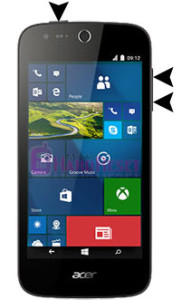
Step 4: After some time you got system recovery mode Use Vol – key select wipe data/factory reset and press Power key to confirm.
?Related article: How to Hard Reset / Factory Reset Oppo R7
Step 5: Use Vol- key to select Yes — delete all user data and press Power key to Confirm. (Notice: when you select Yes — delete all user data and press POWER key you lost your phone all user data)
Step 6: Wait until complete reset your phone, select reboot system now and press Power key.
Step 7: Now your tablet device will reboot.
Step 8: Your Android tablet device is now OK!!
?Related article: How to Hard Reset / Factory Reset Oppo Neo 5S
Factory resets steps:-
Step1: First Turn on your Acer Liquid Z530S device.
Step 2: Touch and Press Menu Button Go To Setting Menu >> Scroll and select Backup & reset >> Factory data reset >> Reset phone >> Erase everything. After factory reset, your tablet device will reboot.
?Related article: Gionee Pioneer P4S Hard Reset
How to Hard Reset Factory Reset Acer Liquid M320
Acer Liquid M320 is the best smartphone in the world. Because ?This mobile display is high quality with this battery performance is good. And this smartphone huge popularity in time. So most user search this phone in all search engine. This mobile’s use new and latest android OS version. This mobile Wi-Fi is very strong. When you to buy this smartphone. You must have to know how to do hard reset/factory reset. For your kind information, when you do hard reset your smartphone, you must backup your all data because after hard reset you lost you’re all valuable data from internal memory. Here we provide you data backup service. Every new post we try to provide you best brand smartphones hard reset solution.
Here some Specifications of Acer Liquid M320: Li-Ion 2000 mAh battery, 2G, 3G, GSM, HSPA network supported, Optional Dual-sim supported, Quad-core 1.1 GHz Cortex-A7 processor, IPS LCD Capacitive touchscreen, 16M colors, RAM 1 GB, internal memory 8 GB, Expandable memory up to 32 GB, 4.5? display, weight 142 g, Back camera 5 MP, Front camera 2 MP, camera pixels 2592 x 1944, autofocus, LED flash, Bluetooth v4.0, A2DP, Wi-Fi 802.11 b/g/n, this phone’s OS is Microsoft Windows 10, Accelerometer, proximity sensors, FM Radio no, HTML Browser, USB supported, microUSB V2.0. If you forgotten your phone pattern lock, user code, google lock or phone code. Now I show you how to do Acer Liquid M320 hard reset.
?Related article: How to Hard Reset/ Factory Reset Acer Liquid Z530
Hard Reset steps :-
Step 1 : First turn off your Acer tablet device.
Step 2 : Release any SIM card and SD card on your smartphone.
Step 3 : Press and Hold Vol+ key and Power key 10 seconds.
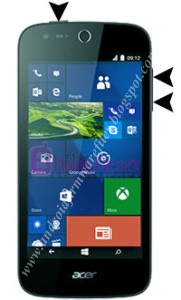
Step 4: When you see the android logo in your mobile screen release only Vol- key.
?Related article: How to Hard Reset/ Factory Reset Acer Liquid Z330
Step 5: After some time you got recovery mode Use Vol – key select Clear eMMC and press Power key to confirm. (Notice: when you select “Clear eMMC” and press “Power key” you lost your phone all user data)
Step 6: Now your tablet device will reboot.
Step 7: Your Android tablet device is now OK!!
?Related article: How to Hard Reset/ Factory Reset Huawei Honor 7
?Related article: How to Hard Reset/ Factory Reset Huawei Honor 7
Factory resets steps:-
Step1: First Turn on your Acer tablet device.
Step 2: Touch and Press Menu Button Go To Setting Menu >> Scroll and select Backup & reset >> Factory data reset >> Reset phone >> Erase everything. After factory reset, your tablet device will reboot.
?Related article: How to Hard Reset/ Factory Reset Huawei G8
How to Hard Reset Factory Reset Acer Liquid Z320
The hard reset is a simple system. Back to the previous innovation you’re mobile. This is the type of system currently has the all android smartphone. Also, the hard reset and factory reset is available Acer Liquid Z320 smartphones. It is a good smartphone in the world. ?This mobile display is high quality with this battery performance is good. And this smartphone huge popularity in time. So most user search this phone in all search engine. This mobile’s use new and latest android OS version. This mobile Wi-Fi is very strong. When you to buy this smartphone. You must have to know how to do hard reset/factory reset. For your kind information, when you do hard reset your smartphone, you must backup your all data because after hard reset you lost you’re all valuable data from internal memory. Here we provide you data backup service. Every new post we try to provide you best brand smartphones hard reset solution.
Here some Specifications of Acer Liquid Z320: Li-Ion 2000 mAh battery, 2G, 3G, GSM, HSPA network supported, Optional dual-sim supported, Quad-core 1.1 GHz Cortex-A7 processor, IPS LCD Capacitive touchscreen, 16M colors, RAM 1 GB, internal memory 8 GB, Expandable memory 32 GB, 4.5? display, weight 142 g, Back camera 5 MP, Front camera 2 MP, camera pixels 2592 x 1944, autofocus, LED flash, Bluetooth v4.0, A2DP, Wi-Fi 802.11 b/g/n, Android OS, v5.1 (Lollipop), Accelerometer, proximity sensors, FM Radio no, HTML Browser, USB supported, microUSB V2.0. If you forgotten your phone pattern lock, user code, google lock or phone code. Now I show you how to do Acer Liquid Z320 hard reset.
?Related article: How to Hard Reset Spice Smart Flo 508 (Mi 508)
Hard Reset steps :-
Step 1 : First turn off your Acer smartphone.
Step 2 : Release any SIM card and SD card on your smartphone.
Step 3 : Press and Hold Vol+ key and Power key 10 seconds.

Step 4: After some time you got system recovery mode Use Vol – key select wipe data/factory reset and press Power key to confirm.
?Related article: How to Hard Reset/Factory Reset Xiaomi Redmi Note 2
Step 5: Use Vol- key to select Yes — delete all user data and press Power key to Confirm. (Notice: when you select Yes — delete all user data and press POWER key you lost your phone all user data)
Step 6: Wait until complete reset your phone, select reboot system now and press Power key.
Step 7: Now your tablet device will reboot.
Step 8: Your Android tablet device is now OK!!
?Related article: How to Hard Reset Vivo Y37 with Hard Reset Solution
Factory resets steps:-
Step1: First Turn on your Acer Liquid Z330 device.
Step 2: Touch and Press Menu Button Go To Setting Menu >> Scroll and select Backup & reset >> Factory data reset >> Reset phone >> Erase everything. After factory reset, your tablet device will reboot.
?Related article: How to Hard Reset Vivo Y35 with Hard Reset Solution
How to Hard Reset Factory Reset Gionee Marathon M5
The hard reset is a simple system. Back to the previous innovation you’re mobile. This is the type of system currently has the all android smartphone. Before the hard reset, the system was not used as much. Or people not knowing how to hard reset. But already has spread widely in. Anyone now can hard reset. In my view, just without you And I want you to learn this the hard reset system. And his job itself. One of the things covered and you can earn money. Mobile hard reset thing you can do at home. Our website only follows. Before you buy a Gionee top smartphone, you have to know how to hard reset/factory reset, because anytime you face your smartphone google lock, pattern lock, forgotten user code problem. For your kind information, when you hard reset your smartphone, you must backup your all data, because after hard reset you lost you’re all valuable data from internal memory. Here we provide you data backup service. Every new post we try to provide best smartphones/Tabs hard reset/factory reset solution.
Here some Specifications of Gionee Marathon M5: Li-Ion 6200 mAh battery, 2G, 3G, GSM, HSPA network supported, Dual-Sim supported, Quad-core 1.3 GHz processor, AMOLED capacitive touchscreen, 16M colors, RAM 2 GB, internal memory 16 GB, Expandable memory up to 64 GB, Card slot (micro-SD), 5.5” display, weight 213 g, Back camera 13 MP, Front camera 5.0 MP, camera pixels 4128 x 3096, auto-focus, LED flash, Bluetooth v4.0, A2DP, Wi-Fi 802.11 b/g/n, hotspot, Android OS v5.1 (Lollipop), Accelerometer, proximity Sensors, FM Radio, HTML5 Browser, USB supported, micro USB V2.0. If you forgotten your phone pattern lock, user code or phone code. Now I show you Gionee Marathon m5 hard reset.
?Related article: How to Hard Reset / Factory Reset Sony Xperia P LT22I
Hard Reset steps :-
Step 1 : First turn off your Gionee smartphone.
Step 2 : Release any SIM card and SD card on your smartphone.
Step 3 : Press and Hold Vol+ key and Power key 10 seconds.
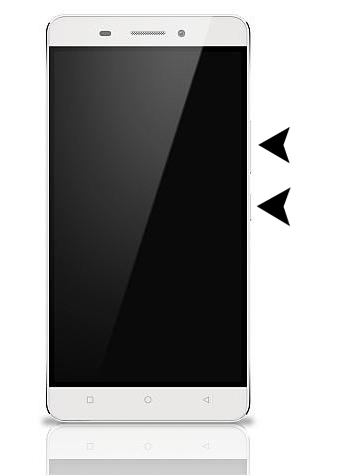
Step 4: After some time you got system recovery mode Use Vol – key select wipe data/factory reset and press Power key to confirm.
?Related article: How to Hard Reset/Factory Reset Xiaomi Redmi Note
Step 6: Now your tablet device will reboot.
Step 7: Your Android tablet device is now OK!!
Factory resets steps:-
Step1: First Turn on your Acer Liquid Z530S device.
Step 2: Touch and Press Menu Button Go To Setting Menu >> Scroll and select Backup & reset >> Factory data reset >> Reset phone >> Erase everything. After factory reset, your tablet device will reboot.
?Related article: How to Hard Reset / Factory Reset Lenovo A3900
How To Hard reset Best smartphone Acer Liquid X1
Before you buy a best smartphone, you must need to know how to hard reset smartphone. we try to provide top smartphones hard reset solution.Here some Specifications of Acer Liquid X1: Li-Ion 2700 mAh battery, 2G, 3G, 4G, GPRS,EDGE,HSDPA, HSPA, LTE network supported, Sim supported, Octa-core 1.7 GHz cortex-A7 processor, IPS LCD capacitive touchscreen, 16M colors, RAM 2GB, internal memory 16GB, Expandable memory up to 32 GB(micro-SD), 5.7” display, weight 164g, back camera 13 MP, Front camera 2.0 MP, camera pixels 4160 x 3120, LED Flashlight, Bluetooth v4.0,A2DP, Wi-Fi 802.11 b/g/n, Hotspot, Android OS V4.4.2(KitKat), Accelerometer, Proximity, Compass Sensors, FM Radio, HTML5 Browser, USB supported, micro USB V2.0.
If you forgotten your phone pattern lock, user code or phone code. I show you how to manually hard reset Acer Liquid X1 Smartphone.
Step 2: Release any SIM CARD AND SD CARD on your SmartPhone.
Step 3: Press and Hold VOL+ KEY, VOL- KEY and POWER KEY or 10 seconds.when you see in your mobile screen 3 MENU then release ALL Hold KEY.
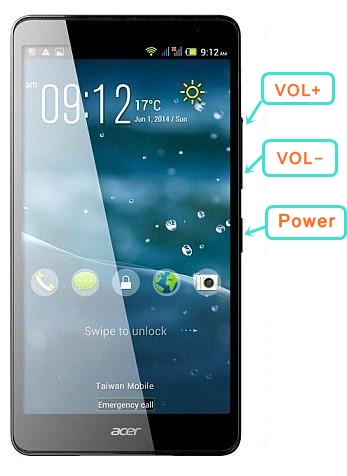
Step 4: Use VOL+ and select RECOVERY, press VOL- to confirm.
Step 5: After sometime you got ANDROID RECOVERY MODE, Use VOL- KEY select WIPE DATA/FACTORY RESET and press VOL+ KEY to confirm.
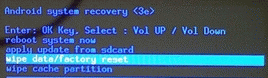
Step 6: Use VOL- KEY to select YES — DELETE ALL USER DATA and press VOL+ KEY to Confirm. (Notice: when you select Yes — delete all user data and press POWER key you lost your phone all user data)
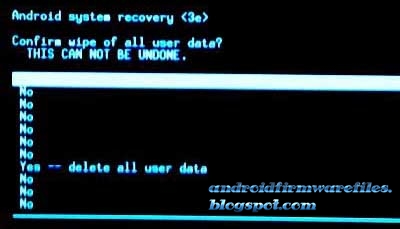
Step 7: Wait until complete RESET YOUR PHONE, select REBOOT SYSTEM NOW and press VOL+ KEY.
Step 8: Now your Smartphone will reboot.
Step 9: Your Android Smartphone is now OK.
If you forgotten your phone pattern lock, user code or phone code. I show you how to manually hard reset Acer Liquid X1 Smartphone.
Best smartphone hard reset steps:
Step 1: First turn off your ACER LIQUID X1 Smartphone.Step 2: Release any SIM CARD AND SD CARD on your SmartPhone.
Step 3: Press and Hold VOL+ KEY, VOL- KEY and POWER KEY or 10 seconds.when you see in your mobile screen 3 MENU then release ALL Hold KEY.
Step 4: Use VOL+ and select RECOVERY, press VOL- to confirm.
Step 5: After sometime you got ANDROID RECOVERY MODE, Use VOL- KEY select WIPE DATA/FACTORY RESET and press VOL+ KEY to confirm.
Step 6: Use VOL- KEY to select YES — DELETE ALL USER DATA and press VOL+ KEY to Confirm. (Notice: when you select Yes — delete all user data and press POWER key you lost your phone all user data)
Step 7: Wait until complete RESET YOUR PHONE, select REBOOT SYSTEM NOW and press VOL+ KEY.
Step 8: Now your Smartphone will reboot.
Step 9: Your Android Smartphone is now OK.
How to flash Samsung Stock Rom using Odin
These are the instructions to flash Samsung Stock ROM (original firmware) using Odin on Windows Computer.
Requirements: Your Samsung Smartphone should have at-least 30-40 percent of phone batter to perform the flashing process.
Flash Samsung Stock Rom using Odin
Step 1: Download and install Samsung USB Driver on your computer. In case you have already installed the Samsung USB Driver on your computer then Skip this step. |
| USB Driver |
 |
| Samsung Galaxy Stock ROM |
Step 3: Now, Enable USB Debugging on your Samsung Galaxy Device. To enable USB Debugging : Open Settings > Developers Option > USB Debugging > Tick to enable.
(Developers Option is hidden for Android 4.2.2 or above, to show the developer option Go to Settings > About Phone > Built Number (Tap on it for 5-8 times).
 |
| Enable USB Debugging on Samsung Stock |
Step 4: Power Off your Samsung Device.
 |
| Power Off Samsung Galaxy |

 |
| Samsung Galaxy Warning Sign |
 |
| Odin files for Samsung Galaxy |
 |
| Open Odin3 for Samsung Galaxy |
 |
| Samsung Galaxy Added to Odin |
 |
| Add PDA File in Odin |
 |
| Select PDA file |
 |
| Start Flash in Odin |
 |
| Start Flash in Odin |
 |
| Recovery Mode on Samsung Galaxy |
Step 15: Once Cache Data is cleared, Select Restart Phone Now from the recovery menu.
 |
| Reboot System Now from Stock Recovery Mode |
Keep in Mind:
[*] Data Loss Process: Flashing Stock ROM is always a data loss procedure. So, always take backup of your personal data before flashing the Stock ROM.
[*] Flashing Stock ROM or Downgrading Stock ROM does not void your Phone warranty. So, dont worry Just Flash the Stock ROM.
How to Root Android N 7 0 Nutella without pc
Root Any Android N 7.0 Nutella smartphone without using Computer .
Do you want to root your android n 7.0 smartphone ? if yes then you are at right place . Today we are here with a guide on How to root Android 7.0 N Nutella by using a android application .
Android 7.0 N is the latest android version from google , Some days ago the update of android N 7.0 touted as Android nutella was pushed in nexus 6P , 5X , 6 , 9 devices . And just within a week of the update ,A recognized Xda developer found the way to get Root access on Android N 7.0 Nutella smartphones .
So lets start the Guide on How to root Android N 7.0 Nutella .
Root Android N 7.0 Nutella by using android app .
As mentioned earlier that we will not use Computer or laptop to root Android N 7.0 Smartphones . All we will use is a Zip file .
How to solve insufficient storage problem in android .
So here is the guide on How to root Android N 7.0 nutella without using pc .
- First of all Download the Supersu root file from Here .
- Download the Supersu in your pc .
- After Downloading the supersu connect your smartphone to pc .
- Now copy the Downloaded file in the root of your sd card .
- After copying disconnect the smartphone from Pc .
- Now turn off your smartphone .
- After complete turn off boot the device in Recovery mode .
- After Booting in to recovery mode you will see many options .
- You have to select " Choose Zip From sd card " .
- Now the rooting procedure will take some time to complete .
- After the successful rooting you will get a Successful root confirmation notification .
- Now go back to main screen and choose " Reboot system Now " .
- And thats All !!!! You have successfully rooted your Android N 7.0 Nutella smartphone without using pc .
If the App show this Device has active root access then it means your device is successfully rooted .
Name and List of devices updating to android N 7.0 .
So this was our guide on How to root Android 7.0 N Nutella without using pc i hope this guide helped you in getting root access on Android 7.0 N Nutella .
How to Rescue Your Files When Windows Fails To Boot
 |
| Save Files - image by MZtech |
If our computer encountered a problem and couldn’t boot the Windows system, first thing we worry about is our important files, reports, documents, pictures, etc. that we haven’t made a backup on other storage like an external hard drive, USB storage device, or on online cloud drive.
Read more »
Subscribe to:
Posts (Atom)