Download TZX-713B V2.1 firmware image (514.6 MB)
Showing posts with label fix. Show all posts
Showing posts with label fix. Show all posts
Friday, July 15, 2016
How to fix itechie A88 7 inch tablet stuck in boot logo
How to Fix iTechie A88 Android Tablet Computer unable to boot up and is stuck in boot logo.
 |
| iTechie A88 tablet stuck on boot logo - image by MZtech |
“I couldn’t determine exactly what caused my Android Tablet to stuck in boot logo every time I turn it on. I haven’t installed any update or flashed its firmware.”
 |
| iTechie A88 Tablet (Black) - image by MZtech |
Specifications:
- Model Name: iTechie A88
- Product Type: Wi-Fi Tablet Computer
- Screen Size: 7.0” ; 800 x 480 resolution ; 5-point capacitive touch screen
- Operating System: Android 4.2 Jelly Bean (upgradeable)
- Processor: AllWinner A13 1.0Ghz ARMv7
- RAM: 512MB
- Device Memory: 4.0 GB NAND Fast Flash
- Connectivity: Wi-Fi 802.11 b/g/n
- Camera: 0.3 MP front ; 2.0 MP back with flash
- Battery: 2000 mAh (milliampere-hour)
Hard Reset:
iTechie A88 recovery mode can be accessed by pressing altogether the power button, volume up (+) button and volume down (-) button. If you can access recovery options, all you have to do is select the reset to factory settings. It could fix “stuck in boot logo” issue.
Flashing Firmware:“I tried accessing recovery mode but it boots directly and stops at logo again. If you are unable to access the recovery mode like me, you need to flash the stock firmware image to the device in order to fix it.”
Things you’ll need:
- Firmware image file
- LiveSuit v1.11 application for your flashing tool.
To make sure you download the correct firmware version for your Android tablet, check on the motherboard number /build number. Unlock download link below.
 |
| iTechie A88 motherboard build number - image by MZtech |
How To Flash Firmware:
- Run LiveSuit application and click yes on whether or not to enter upgrade guide.
- Select General Upgrade Mode.
- Select Yes on Whether to select new image file.
- Browse and select the downloaded firmware image file.
- Make sure your tablet is off before connecting to PC.
- Connect tablet to Computer with USB (Universal Serial Bus) cord.
- Press and hold Power button and volume up (+) button.
- Release buttons once connection is detected by LiveSuit application.
- Flashing will start right away.
- Flashing will take a couple of minutes. Secure your USB connection to make sure your tablet doesn’t disconnect while flashing to avoid error.
- You will see a prompt if the flashing process finished successfully.
- You can now boot your tablet by turning it on. (Note: first boot after flashing may take a little longer than usual.)
- The default language is in Hindu. To change it to back to English, go to settings –> select Language & input (letter A icon) –> select the very first option in the selection on the right side –> scroll down to find English and select it. ( change also the input language of your keyboard).
 |
| LiveSuit application flashing firmware - image by MZtech |
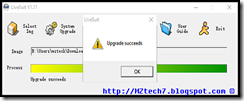 |
| LiveSuit application flashing successful - image by MZtech |
Did this solution helped you? Please let me know by providing your feedback below. If you find this post helpful, dont forget to hit like or share buttons.

How to Fix Lenovo A536 by Flashing Firmware
Fix Or Factory Reset Your Lenovo A536 By Flashing Its Stock ROM / Firmware
 |
| Lenovo A536 Photo by MZtech |
Lenovo A536 Specification:
Year Released: 2014
SIM and Network: Dual MicroSim, GSM/HSPA
Size (Dimension): 5.50 x 2.83 x 0.39 in , weight - 148g
Screen: 5.0 in Multitouch Capacitive Touchscreen, 16M colors
Platform: Android O.S. 4.4.2 KitKat
Chipset: MediaTek MT6582M
CPU: Quad-Core 1.3Ghz Cortex A7
Memory: 8 GB Internal, 1 GB RAM, micro SD up to 32 GB
Camera: 5 MP (Megapixel) auto-focus with LED flash, 2 MP Secondary Camera, 1080p Video Resolution
Battery: Li-Po (Lithium Polymer) 2000 mAh (milliampere-hour), up to 300 hours standby time, up to 12 hours talk time
Why do you need to flash Lenovo a536 back to its stock ROM / firmware? There are various reasons but most of the time you need to flash it if:
- Wiping it back to factory settings doesnt work.
- Stuck at boot logo
- Phone wont start up / turn on.
- Forgotten pattern lock
How to flash Lenovo A536:
Things you need to download:
- Lenovo A536 Stock Rom / Firmware.
- SP Flash Tool.
DOWNLOAD TOOL
- Mediatek Drivers.
DOWNLOAD DRIVERS.
- Extract downloaded Stock ROM zip file.
- Extract SP Flash Tool.
- Run SP Flash Tool. Click on scatter file and load the scatter file found in extracted ROM file.
- Click on Download button.
- Turn off your phone and connect to PC using USB (Universal Serial Bus) cord.
- And wait for flashing to start by seeing the tab on SP Flash Tool loads with color red followed by color yellow. You will see a check mark pop up when its done successfully.
When you click Download Button in SP Flash Tool and you see an error message pop-up,
BROM Error
,format the device first before flashing.
If you have questions, need assistance, or feedback, feel free to post your comments below.
BROM Error
,format the device first before flashing.
If you have questions, need assistance, or feedback, feel free to post your comments below.
See Also:
Samsung Galaxy S4 (GT-i9505) Stuck At Boot Logo
OPlus O+ 8.31z Stock ROM / Firmware
Firefly Mobile S60 V4 Firmware
Fix Parse Error – There is a Problem Parsing the Package
Android OS is the most popular smartphone OS as of today, and that must be because of its vast app collection. It is also an open source OS, so yeah that could be the reason as well. So, if an Android user prefers to switch to a new mobile OS, they will look for the apps collection and then decide if they want to make the move. Nevertheless, with all the advantage, the Android OS is not immune to errors and user keeps facing one or another frequently.

One of the oldest and most common error faced by Android users would be the Parse error in Android. The error pops up when you try to install an app on your Android phone. The full error looks like “Parse error – there is a problem parsing the Package”. The error is simple to understand with the error message saying “the application cannot be installed on your phone due to an issue with the parsing.”
If you keep tinkering with the Android apps by making changes to the apps manifest file, then also, the “Parse error” in Android would occur. There are several reasons for the Parse error in Android and today we will be discussing the possible solutions to fix the parse error in Android.
This solution is only for the people who keep messing with apps Manifest file to make a modification to it. So, if you are one of them and made any changes to the Apps Androidmanifest.xml file then try restoring the file to its default state. Things you need to make sure to fix the parse error while installing an Android app:
The name of the .apk has been changed – So, if the original .apk was named as original.apk, and you renamed it to original1.apk then you may need to rename it to its original name that is “Original.apk”.
Once renamed, try to install the app on your Android phone and see if the parse error has been resolved.
The problem with your App’s code – Well, this isn’t something that I can troubleshoot and say what went wrong. But, if there is a problem with your code, you may need to look into that.
Fix 2: Allow Apps Installation from Unknown Sources
For the security reasons, the Android smartphone does not allow you to install apps from third-party sources or sources apart from the Google Play Store. Installing third-party apps from unknown sources can harm your Android phone.
So, if you are trying to install a .apk file then you may face the “parse error – there is an error parsing the package”. To fix this, what you can do here is allow app installation from the unknown sources. You can find the settings to the same under Security settings of your phone.
To allow app installation from the unknown sources, go to Settings and look for Security option under “Input and Control.”
Tap on Security and under Device administrators tap on “Unknown Sources, allows installation of apps from unknown sources”. If asked to confirm, tap OK.
Go back to the folder where you have the .apk located. Tap on it and install the app without parse error.
Fix 3: Enable USB Debugging
Enabling USB debugging isn’t really necessary for installing Android apps using the .apk file. But, for some users, enabling the USB debugging seems to have worked very well.
To enable USB debugging, you need to enable Developer Option in your Android phone first.
To enable “Developer option” go to, Settings, scroll down and tap on About Phone and then tap seven times on the “Build Number”. You should see a “You are now a developer” message on the screen.
Next, go to Settings again, scroll down and tap on Developer Options. Under developer options, tap on USB debugging and enable it.
The procedure to enable USB debugging for different devices will be different. There are dedicated websites such Enable USB Debugging with detailed instructions to do the same.
Fix 4: Disable Antivirus
The parse error can also occur if your security application is blocking the installation. Most of the Antivirus try to block the installation of the applications that may look untrusted or suspicious. So, if you are trying to install a .apk, the possibility is that your Antivirus app might be blocking the .apk file and preventing the installation.
So, try disabling the Antivirus temporarily and try to install the .apk file. This time, you should be able to install the .apk file without receiving any parse error in Android.
Fix 5: Corrupted APK or Partially Downloaded File
The phrase error – there is a problem parsing the package error can also occur due to a corrupted .apk file. Try downloading the fresh apk and install it. See if this can resolve the error. Also, make sure you download the complete file. Sometimes, you may partially download a .apk file and face Parse error while installing it.
Fix 6: Incompatible App
Some Android apps do not support the older version of the Android OS. Some apps do not support the older hardware of the smartphone. So, when you try to install an app which requires Android 4.4 KitKat above on an Android 4.3 Jelly Bean running smartphone then you will get “Parse error – there is a problem parsing the package” message. So, make sure you read the app description about the requirement on the Google Play Store.
One of the oldest and most common error faced by Android users would be the Parse error in Android. The error pops up when you try to install an app on your Android phone. The full error looks like “Parse error – there is a problem parsing the Package”. The error is simple to understand with the error message saying “the application cannot be installed on your phone due to an issue with the parsing.”
If you keep tinkering with the Android apps by making changes to the apps manifest file, then also, the “Parse error” in Android would occur. There are several reasons for the Parse error in Android and today we will be discussing the possible solutions to fix the parse error in Android.
Causes of the Parse error in Android?
- Before we proceed to the fixes, let’s see what can cause Parse error in Android. The parse error occurs while installing an Android app on your phone. But, the causes can be different.
- Parse error can occur if you have made changes to the app’s manifest file like changing the Android version.
- It can also occur due to a corrupted .apk file or may because of a partially downloaded apk file.
- Not enough permission to install third-party apps from unknown sources.
- Your Android smartphone OS version or the hardware is not compatible with the app.
- A third-party security application is blocking the app installation.
Fix Parse Error – There is a Problem Parsing the Package
Fix 1: Check Your Apps Manifest FileThis solution is only for the people who keep messing with apps Manifest file to make a modification to it. So, if you are one of them and made any changes to the Apps Androidmanifest.xml file then try restoring the file to its default state. Things you need to make sure to fix the parse error while installing an Android app:
The name of the .apk has been changed – So, if the original .apk was named as original.apk, and you renamed it to original1.apk then you may need to rename it to its original name that is “Original.apk”.
Once renamed, try to install the app on your Android phone and see if the parse error has been resolved.
The problem with your App’s code – Well, this isn’t something that I can troubleshoot and say what went wrong. But, if there is a problem with your code, you may need to look into that.
Fix 2: Allow Apps Installation from Unknown Sources
For the security reasons, the Android smartphone does not allow you to install apps from third-party sources or sources apart from the Google Play Store. Installing third-party apps from unknown sources can harm your Android phone.
So, if you are trying to install a .apk file then you may face the “parse error – there is an error parsing the package”. To fix this, what you can do here is allow app installation from the unknown sources. You can find the settings to the same under Security settings of your phone.
To allow app installation from the unknown sources, go to Settings and look for Security option under “Input and Control.”
Tap on Security and under Device administrators tap on “Unknown Sources, allows installation of apps from unknown sources”. If asked to confirm, tap OK.
Go back to the folder where you have the .apk located. Tap on it and install the app without parse error.
Fix 3: Enable USB Debugging
Enabling USB debugging isn’t really necessary for installing Android apps using the .apk file. But, for some users, enabling the USB debugging seems to have worked very well.
To enable USB debugging, you need to enable Developer Option in your Android phone first.
To enable “Developer option” go to, Settings, scroll down and tap on About Phone and then tap seven times on the “Build Number”. You should see a “You are now a developer” message on the screen.
Next, go to Settings again, scroll down and tap on Developer Options. Under developer options, tap on USB debugging and enable it.
The procedure to enable USB debugging for different devices will be different. There are dedicated websites such Enable USB Debugging with detailed instructions to do the same.
Fix 4: Disable Antivirus
The parse error can also occur if your security application is blocking the installation. Most of the Antivirus try to block the installation of the applications that may look untrusted or suspicious. So, if you are trying to install a .apk, the possibility is that your Antivirus app might be blocking the .apk file and preventing the installation.
So, try disabling the Antivirus temporarily and try to install the .apk file. This time, you should be able to install the .apk file without receiving any parse error in Android.
Fix 5: Corrupted APK or Partially Downloaded File
The phrase error – there is a problem parsing the package error can also occur due to a corrupted .apk file. Try downloading the fresh apk and install it. See if this can resolve the error. Also, make sure you download the complete file. Sometimes, you may partially download a .apk file and face Parse error while installing it.
Fix 6: Incompatible App
Some Android apps do not support the older version of the Android OS. Some apps do not support the older hardware of the smartphone. So, when you try to install an app which requires Android 4.4 KitKat above on an Android 4.3 Jelly Bean running smartphone then you will get “Parse error – there is a problem parsing the package” message. So, make sure you read the app description about the requirement on the Google Play Store.
Thursday, July 14, 2016
How To Fix Invalid IMEI NVRAM Error
Invalid IMEI / NVRAM Error After Flashing With Stock Firmware
After Flashing a MediaTek Android device with its firmware using SP Flash Tool, one common issue we usually meet is having an invalid IMEI which makes our device unable to connect to cellular networks as well as Wi-Fi networks. To fix this, we should fix our IMEI number by manually entering the number to the device using MTK Droid Tool.
Device:
Android MediaTek phone (ex: MT6575, MT 6572, MT6588, MT6589)
Process:
- Full Wipe Data and Hard Reset in recovery mode.
- Flashed firmware using SP Flash Tool.
 |
| Invalid IMEI , No network connection - image by MZtech |
- No network connection - error message "Unable to register network, please try again later".
- Wi-Fi unable to connect - error message "Invalid NVRAM".
- Dial #06# result - IMEI Invalid.
- Sim Settings is grayed out.
How To Fix:
- Copy to notepad the IMEI (International Mobile Station Equipment Identity) number found at the back of your device.
 |
| IMEI - image by MZtech |
- Enable USB Debugging in your device.
- Connect your device to your PC through USB.
- Root your Android Device and reboot. You can use this Android Rooting Tool.
- Download and Install MTK Droid Root & Tools v2.5.3. Right click to MTK Droid Tool application and run it as administrator.
 |
| MTK Droid Root & Tools Screenshot - image by MZtech |
- Click Root button in MTK Droid Tools. (If successfully rooted, yellow box will turn green.)
- Click IMEI/NVRAM button and put the IMEI number you have copied earlier and click apply.
- Reboot device for changes to take effect.
- To verify if successfully fixed, dial #06# on your device to check for your IMEI number.
- Check for you network connection.
If you find this post helpful, don’t forget to click like or share buttons. If have some questions, post it in comments section below.
Subscribe to:
Posts (Atom)